Build a Rendering Plugin to Integrate Velocity with IBM WCM
Posted on Dec 26, 2012 (last modified Sep 14, 2021)
 In this multi-part series, you will learn how to make your developers and advanced content authors happy by extending IBM Web Content Manager (WCM) with a custom rendering plugin that integrates the Apache Velocity Engine. Your users will then be able to use Velocity templates within WCM content, which can give them JSP-like capabilities without the need for server-side deployments.
Velocity Plugin for IBM WCM
- A simple and powerful templating language
- Variable assignment and reuse, if-else conditional logic and for-each looping
- Access to Java objects and methods from within WCM content
For this exercise, we will be developing on IBM WebSphere Portal v8 although I’m pretty sure this will all work the same or similarly on WebSphere Portal v7. For development, I’m using IBM Rational Software Architect v8.5, but Rational Application Developer or any Eclipse-based IDE will do. In this first part of the series, you will learn how to make a custom rendering plugin for WCM, which is an awesome thing to know in and of itself. In successive parts, we will then build upon this base to turn our plugin into a useful tool that will empower your WCM developers and advanced content authors to do even greater things with WCM.
Lesson Plan
- Step One – Create a New Dynamic Web Project
- Step Two – Create a Landing Page for Your plugin
- Step Three – Add the EAR Project to the WebSphere Portal Server in Your IDE
- Step Four – Start the Server and Test the Web App
- Step Five – Create the Initial Rendering Plugin Class
- Step Six – Create plugin.xml File
- Step Seven – Test the plugin with WCM Content
- Step Eight – Add Velocity Engine Java Libraries
- Step Nine – Develop a Simple Console Test
Step One – Create a New Dynamic Web Project
You can create a WCM rendering plugin using just a .jar file, but building it as a web app allows us to more easily publish into WebSphere directly from our IDE. It also gives us more long-term flexibility. So, let’s start by building a new Dynamic Web App project…
In Rational, select File > New Project

In the New Project dialog, select Dynamic Web Project under the Web category. You may need to check the Show All Wizards check-box in order to see the Web category.

Click the Next button. If you haven’t yet enabled all of the related activities in Rational, you may get a view asking you to. If so, enable them – of course. Otherwise, your next view is going to look like the following and you should fill it out as shown.

Click Next twice in order to get to the part where you can check the box to Generate web.xml deployment descriptor; we’ll need that.

Click Finish. You should end up with two projects in your IDE as shown; VelocityRenderPlugin and the EAR, VelocityRenderPluginEAR.

Step Two – Create a Landing Page for Your plugin
Even though it isn’t necessary, I like to create a landing page for my plugin so that I have a place to write usage instructions and version information. It also helps administrators validate deployment of the plugin without having to go all the way into WCM.
Right-click on the WebContent folder and choose New > JSP File.

Name the file index.jsp and click Finish.

For now, I’ve just given a nice title to the page and put some handy links to the Apache Velocity Engine home page and the Velocity User Guide.

Step Three – Add the EAR Project to the WebSphere Portal Server in Your IDE
If you’re using Rational, you can now add your EAR project to the server within your IDE. This will allow you to publish code changes rapidly as you work.
Right-click on the IBM WebSphere Portal Server in the Servers view and the select Add and Remove… from the context menu.

Next, select the VelocityRenderPluginEAR project in the Available panel at left of the view and then click the ‘Add >’ button to move it over to the Configured panel on the right.

Click the ‘Finish’ button and then you should see that the project is added to your WebSphere Portal server as shown below…

Step Four – Start the Server and Test the Web App
Now, we can start the server and then access the index page to give the project a quick test. That is to say – we can check that it’s deploying to our portal server and we’re now ready to start coding.
Right click in the WebSphere Portal Server in the Servers view and then select Start from the context menu or press CTRL + ALT + R.

The Console view in Rational will start spitting out a bunch of log statements as the server starts and when the server has started, you should be able to access the web app in your browser at http://<host>:<port>/VelocityRenderPlugin/

Cool beans and awesome sauce! This is confirmation that the basic web app is deploying properly and now we can start coding our plugin.
Step Five – Create the Initial Rendering Plugin Class
Next, we’ll stub-out the custom rendering plugin class. For this step, you might want to first review ‘Creating a rendering plugin class‘ in the IBM WebSphere Portal Family wiki.
First, let’s create a Java package for our code. In your IDE, right-click on the src node and select New > Package from the context menu.

Fill in the name for your package and click the Finish button. I’m using the name ‘com.base22.wcm.plugin.rendering’…

Now, right-click on the Java package node and select New > Class…

Name the class “VelocityPlugin”. We’ll need to extend a particular interface, so before clicking Finish, click on the ‘Add…’ button to the right of the Interfaces field…
This displays another dialog, where you can find interfaces that the class might implement. Type com.ibm.workplace.wcm.api.plugin.rendering.RenderingPlugin and then click OK.

The RenderingPlugin interface should then show inside of the Interfaces field as shown below and you can click the Finish button.

The Java class file is generated with all the methods from the RenderingPlugin interface stubbed out and ready for your implementation…

Copy the following code, and replace the contents of the VelocityPlugin.java file. This will give us something simple that we can use to perform another test to ensure the plugin is visible in the WCM Authoring interface and usable in WCM content.
package com.base22.wcm.plugin.rendering;

import java.io.IOException;
import java.io.Writer;
import java.util.ArrayList;
import java.util.Iterator;
import java.util.List;
import java.util.Locale;
import java.util.Map;
import java.util.Set;

import com.ibm.portal.ListModel;
import com.ibm.portal.ModelException;
import com.ibm.workplace.wcm.api.plugin.rendering.RenderingPlugin;
import com.ibm.workplace.wcm.api.plugin.rendering.RenderingPluginException;
import com.ibm.workplace.wcm.api.plugin.rendering.RenderingPluginModel;

/** * A rendering plugin that integrates the Velocity Template Engine with WCM. */
public class VelocityPlugin implements RenderingPlugin {

    /** * A simple list model holding locales. */
    protected static class SimpleLocaleListModel implements ListModel {

        /** the list of locales of this list model */
        final List m_localeList = new ArrayList();

        /** * Constructs this simple list model holding the given locales. * * @param locales * the locales of this list model. May be <code>null</code>. */
        public SimpleLocaleListModel(final Locale[] p_locales) {
            if (p_locales != null) {
            for (int i = 0; i < p_locales.length; ++i) {
                m_localeList.add(p_locales[i]);
            }
            }
        }

        /* * (non-Javadoc) * * @see com.ibm.portal.ListModel#iterator() */
        @Override
        public Iterator iterator() throws ModelException {
            return m_localeList.iterator();
        }

    }

    /** a list model that only contains the English language locale */
    private static final ListModel ENGLISH_ONLY = new SimpleLocaleListModel(new Locale[] { Locale.ENGLISH });

    /* * (non-Javadoc) * * @see com.ibm.portal.Localized#getDescription(java.util.Locale) */
    @Override
    public String getDescription(final Locale p_locale) {
        return "Provides ability to use Velocity Templates in WCM.";
    }

    /* * (non-Javadoc) * * @see com.ibm.portal.Localized#getLocales() */
    @Override
    public ListModel getLocales() {
        return ENGLISH_ONLY;
    }

    /* * (non-Javadoc) * * @see com.ibm.workplace.wcm.api.plugin.rendering#getName() */
    @Override
    public String getName() {
        return "Velocity";
    }

    /* * (non-Javadoc) * * @see com.ibm.portal.Localized#getTitle(java.util.Locale) */
    @Override
    public String getTitle(final Locale p_locale) {
        return "Velocity";
    }

    /* * (non-Javadoc) * * @see * com.ibm.workplace.wcm.api.plugin.AuthoringPlugin#isShownInAuthoringUI() */
    @Override
    public boolean isShownInAuthoringUI() {
        return true;
    }

    /* * (non-Javadoc) * * @see com.ibm.workplace.wcm.api.plugin.rendering.RenderingPlugin# * render(com.ibm.workplace.wcm.api .plugin.rendering.RenderingPluginModel) */
    @Override
    public boolean render(final RenderingPluginModel p_model) throws RenderingPluginException {
        final Map<String, List> params = p_model.getPluginParameters();

        // determine whether the inner contents of the plugin should actually be
        // rendered
        final boolean renderBody;
        final List renderBodyList = params.get("renderbody");
        if (renderBodyList != null && renderBodyList.get(0).equals("false")) {
            renderBody = false;
        } else {
            renderBody = true;
        }

        // render the output of the plugin to the writer provided by the
        // RenderingPluginModel
        final Writer writer = p_model.getWriter();
        try {
            writer.write("<b>Velocity Rendering Plugin</b>");

            final Set keys = params.keySet();

            final Iterator iter = keys.iterator();
            while (iter.hasNext()) {
                String key = iter.next();
                writer.write(" " + key + " = " + params.get(key));
            }

            writer.write(" ");
        } catch (IOException e) {
            e.printStackTrace();
        }

        return renderBody;
    }

}
Step Six – Create plugin.xml File
In order to register the plugin with WCM, we need to create a plugin.xml file and place it within our project’s WEB-INF directory…
WEB-INF/plugin.xml
<?xml version="1.0" encoding="UTF-8"?>
<?eclipse version="3.0"?>
<plugin id="com.base22.wcm.VelocityPlugin" name="Velocity Rendering Plugin" version="1.0.0" provider-name="Base22">
<extension point="com.ibm.workplace.wcm.api.RenderingPlugin" id="VelocityPlugin">
<provider class="com.base22.wcm.plugin.rendering.VelocityPlugin"/>
</extension>
</plugin>
Pete Raleigh, IBM WebSphere Portal Consultant at IBM, posted the following comment on LinkedIn. While he was referring to Custom Workflow Actions and not WCM plugins, both use the same plugin.xml mechanism, so I thought I’d repost his comment here. Though I have not tested it, it may also hold true in this case. Thanks, Pete!
When editing / creating a plugin.xml file for your Custom Workflow Actions, ensure the order of attributes for the “extension” tag are correct. They must have “point” first followed by “id”. If they are the other way around, they will not work. – Pete Raleigh
Step Seven – Test the plugin with WCM Content
Now, you can publish the application to your server and test using it’s tag WCM content.
After publishing the web app, navigate into the WCM Authoring interface and create a new HTML component…

When the new HTML Component form appears, click in the HTML Element field to place the cursor / caret there and then click the ‘Insert a Tag’ button.

A pop-up window appears.
Select ‘Plugin Component’ for the tag type and then ‘Velocity’ as the plugin to reference as shown…
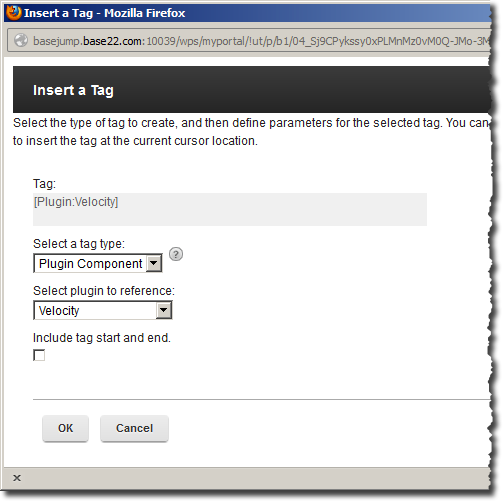
When you click OK, the tag should appear in your HTML Element field as shown…

The stub code we’ve used is written to accept and echo back any arbitrary attribute and attribute values given to the tag, so let’s type some in like so…

Now save and preview the HTML Component and you should see the following result in your browser:

Step Eight – Add Velocity Engine Java Libraries
Next, we need to add the Velocity Engine library and its dependencies.
Download the latest stable version of Velocity (that’s velocity-1.7.zip at the time of this writing).
In the root of the archive, you will find velocity-17.jar, which you’ll need to place in the project’s WEB-INF/lib folder. There’s also a lib directory in the archive containing some dependency jar files you’ll also need to put in WEB-INF/lib; they are avalon-logkit, commons-collections, commons-lang, and oro. You’re WEB-INF/lib directory should look the same or similar to what’s depicted below:

Step Nine – Develop a Simple Console Test
One quick and simple way to validate functionality is to add a main method to your class. This will allow you execute the class in order to perform some quick validation tests outside of the normal deployment to WebSphere. First, add the following two methods two the VelocityPlugin.java file.
public String getRenderedTemplate() {
    /* first, we init the runtime engine. Defaults are fine. */
    Velocity.init();

    /* lets make a Context and put data into it */
    VelocityContext context = new VelocityContext();
    context.put("name", "Velocity");
    context.put("project", "Jakarta");

    StringWriter w = new StringWriter();
    String s = "We are using $project $name to render this.";
    Velocity.evaluate( context, w, "mystring", s );

    return w.toString();
}

/** * A main method for convenient console testing... */
public static void main(String[] args) {
    VelocityPlugin plugin = new VelocityPlugin();
    System.out.println( plugin.getRenderedTemplate() );
}
Note that with the addition of these methods, you’ll also need to add the following imports:
import java.io.StringWriter;
import org.apache.velocity.VelocityContext;
import org.apache.velocity.app.Velocity;- The main method initializes an instance of the VelocityPlugin class and then calls the getRenderedTemplate() method – printing the resulting string to the console.
- First, we initialize the Velocity runtime engine.
- We then create a VelocityContext. The context is sort of like a HashMap in which we can put key/value pairs. Anything put into the context will be accessible from the user’s template as variables such as ‘name’ and ‘project’.
- A simple template is written in VTL. As our plugin progresses, we’ll give users the ability to put templates into HTML Components or File Resources in WCM, but for now, this will prove that everything’s hooked up properly. Notice that the template contains variable placeholders to access values that are expected to be in the context ($project and $name; variables in VTL are preceded with a dollar sign)
- We merge the template with the context and push the rendered results of that merge into a StringWriter.
- Finally, we return the rendered results as a String, which are then printed to the console.
If all goes well, the output should be printed to the Console view in your IDE as shown below:

Voila! The variable $project was replaced with the value, ‘Jakarta’ that was placed in the Velocity context and the variable $name was replaced with the value ‘Velocity’.
Hopefully, at this point, you’re starting to see the value in this. Yes – this means that anything we shove into the Velocity context will be accessible to developers and authors from within WCM content. That could be user profile attributes, objects from the WCM or Portal APIs, values from a back-end database, or whatever.
Conclusion
In today’s class, we learned how to make a custom rendering plugin for WCM. We also learned how to incorporate the Velocity Engine into our code.
In part 2 of this series, we’re going to take our plugin to the next level by making it so that Velocity templates can be written inside of HTML Components and then referenced by an attribute in our custom tag like this:
[Velocity lib=”Web Content” cmpnt=”HTML – My Velocity Template” vars=”name=Velocity | project=Jakarta”]
Reference Resources
Following are some of the reference resources I used to research and write this article.
- Apache Velocity Site – Velocity Engine – Velocity is a Java-based template engine. It permits anyone to use a simple yet powerful template language to reference objects defined in Java code.
- Apache Velocity 1.7 User Guide – The Velocity User Guide is intended to help page designers and content providers get acquainted with Velocity and the syntax of its simple yet powerful scripting language, the Velocity Template Language (VTL).
- Creating custom plugins – WebSphere Portal Family wiki documentation on the various plugin types you can develop for IBM WCM.
- Creating a rendering plugin class – WebSphere Portal Family wiki documentation on the rendering plugin type upon which this article is based.