My Recipe for Managing Contacts in Obsidian
Because people should be “first-class citizens” in your knowledge vault, just as they are in your life.
· Personal knowledge management
In this article, I share my personal recipe for managing contacts in Obsidian.
Last Modified: Aug 29, 2024

If you’re wondering why one would do such a seemingly ludicrous thing as managing contacts in Obsidian (as opposed to using a purpose-built contacts app or back-office app like Microsoft Outlook), then take a look first at my previous article, Contacts in Obsidian? Heck yeah! where I described my top 6 reasons. Here they are again, in short:
Why Manage Contacts in Obsidian?
1. Query and report on people and their properties.
2. Search
by specific metadata properties.
3. Classify and organize
people into membership groups.
4. Link and browse people by
their relationship to things and to one another.
5. Take rich
notes that promote good relationship habits such as the “Follow
Up.”
6. Provide a single point of access to A.I. agents for
Retrieval Augmented Generation (RAG).
OK, this is a recipe, not an essay, so let’s get straight to it.
Folders
In my system, I use the concept or class “Person” to represent instances of people (each with contact information, among other things).
Wherever it fits in your own vault’s file structure, create a parent folder called Persons with the following recommended child folders for alphabetically organized entries:
📂 Persons
….📁 A — C
….📁 D — F
….📁 G — J
….📁
K — M
….📁 N — R
….📁 S — T
….📁 U — Z
📂
Templates
In my system, I title and organize Person instances by first name first (“John Doe” not “Doe, John”). This is important because when I am creating notes, I link people’s names when I mention them in my notes and I want the text of those links to read naturally as shown below.
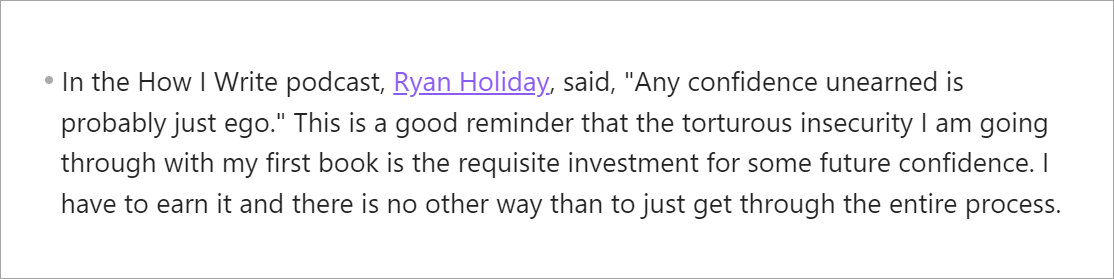
With that in mind, my alphabetical grouping of folders aims to balance the number of entries per folder. By analyzing common first names, we can determine that certain letters, like “A”, “M”, and “S”, are more common, so they are paired with fewer letters to maintain balance. This set is purposely limited to “Miller’s Magical Number 7,” but feel free to break the groups into more detail or to adjust them to better fit your own records.
I also recommend creating a “Templates” folder somewhere, if you don’t already have one. You’ll need it for storing the Person template document, described next.
Person Template
Create a new markdown file in the Templates folder called “Template — Person”.
📂 Templates
….📄 Template — Person
Common Contact Properties
Because we’re going to be querying across our Person documents, it is important that they share a set of common properties. At a minimum, these properties should reflect the common properties you would normally find for a contact record, plus any special properties you care to add. A standard set of common properties can be found on the Schema.org type for Person.
- givenName — Given name. In the U.S., the first name of a Person.
- familyName — Family name. In the U.S., the last name of a Person.
- jobTitle — The job title of the person (for example, Financial Manager).
- email — Email address.
- email2 — Secondary email address.
- telephone — The telephone number.
- streetAddress — The street address. For example, 1600 Amphitheatre Pkwy.
- city — Center of population, town, municipality.
- stateOrProvince — Region within a country; states are found in the U.S. and provinces are found in countries like Canada and Italy.
- postalCode — The postal code. For example, 94043.
- country — The nation as a distinct part of the world.
- birthDate — Date of birth.
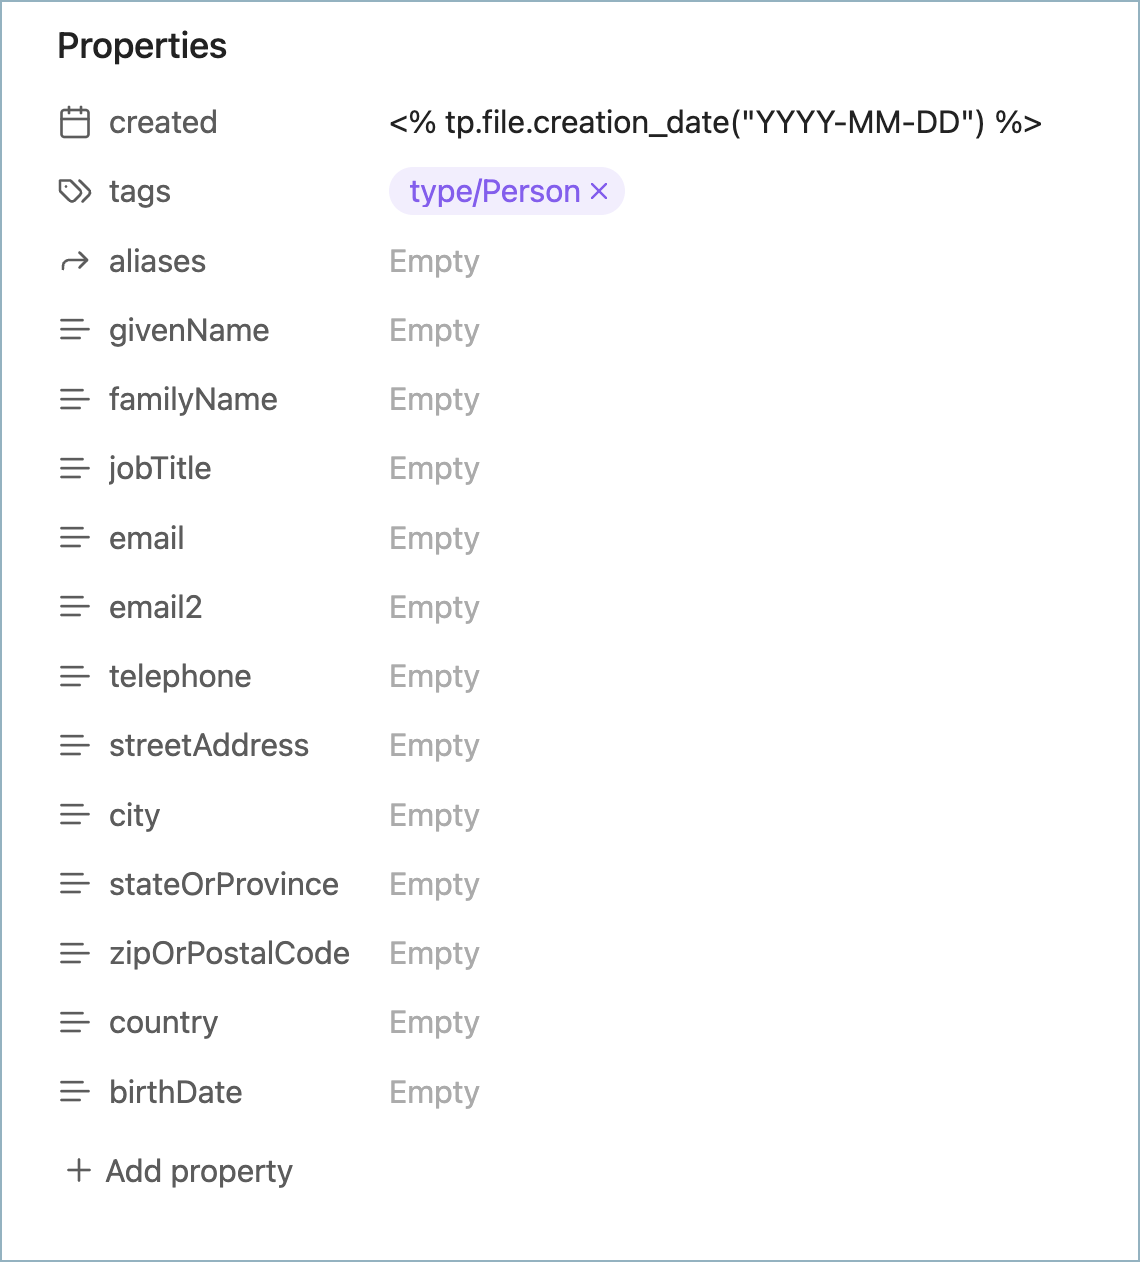
Note that the template is tagged with #type/Person to identify its type. This helps when browsing and searching people by tags and by Dataview plugin queries.
Note that I do not include the common “company” property. That is because I use the “tags” property and apply an Organization membership tag for this purpose. More on that later.
Note also that, for property names, I prefer the lower camel case capitalization style (with no spaces) as it conforms to the Resource Description Framework standards established by the W3C (keeping your data more compatible with future plugins and A.I. systems that may leverage Semantic Web standards).
Templater Trick: Optionally Prompt for a Title and Automatically Move the File
If you use the Templater plugin for Obsidian, you can use the following snippet. When you create a new file using the Person template, you will be prompted for the name and that name will be used for both the name of the file and the page title (heading 1). Additionally, based on the name, the file will be automatically moved into a new folder of the same name, within the appropriate alphabetical classification.
A parent folder is created for each person instance so that attachments and future files related to the person will have a logical home. This especially works well when you use the Folder notes plugin because then, when you click on a person folder, it will automatically open the folder note, which bears the same file name.
<%*
let title = tp.file.title
if ( title.startsWith("Untitled") ) {
 title = await tp.system.prompt("Person name (first last): ")
 await tp.file.rename(title)
}

let firstLetter = title.charAt(0).toUpperCase()
let folder = ""

if (firstLetter >= "A" && firstLetter <= "C") {
 folder = "3 Resources/Persons/A - C"
} else if (firstLetter >= "D" && firstLetter <= "F") {
 folder = "3 Resources/Persons/D - F"
} else if (firstLetter >= "G" && firstLetter <= "J") {
 folder = "3 Resources/Persons/G - J"
} else if (firstLetter >= "K" && firstLetter <= "M") {
 folder = "3 Resources/Persons/K - M"
} else if (firstLetter >= "N" && firstLetter <= "R") {
 folder = "3 Resources/Persons/N - R"
} else if (firstLetter >= "S" && firstLetter <= "T") {
 folder = "3 Resources/Persons/S - T"
} else if (firstLetter >= "U" && firstLetter <= "Z") {
 folder = "3 Resources/Persons/U - Z"
}

// Move the file to the appropriate folder
await tp.file.move(folder + "/" + title + "/" + title)
%>

# <% title %>
Note: If you use the Filename Heading Sync plugin, you should disable it temporarily when creating using the snippet above or your file will be renamed to “<% title %>,” which, of course, you probably don’t want. Once you create the template, you can re-enable the plugin.
Add Section Headers to Taste
In addition to frontmatter properties, you can add section headers to your Person template, which will act as placeholders and reminders for the kinds of notes you might keep about a given person.
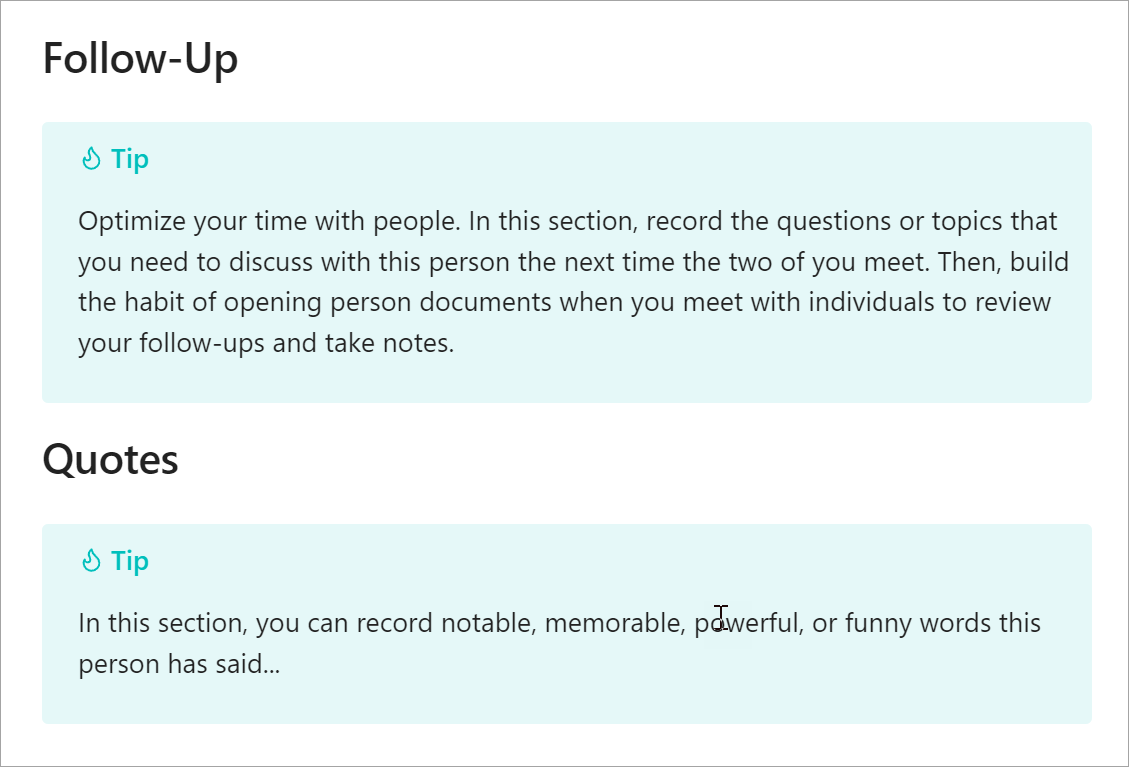
My personal favorite is the heading “Follow Up,” which reminds me of things I need to discuss with a given person when we meet again. This works for me because I’ve made a habit of opening a given person’s document every time we connect. I also like “Quotes” for recording the notable, memorable, powerful, or just funny words a person has said.
Personally, that’s it for me. I otherwise like to keep my notes for a given person freeform and ad-hoc. But, in case you want some ideas, I’ve taken a look at some of the templates other Obsidian users have published and asked ChatGPT for some ideas. I’ve compiled those together with my own in the list below:
Optional Person Section Headers
- Follow Up
- Quotes
- Key Relationships
- Quick Bio
- Personal Background
- Professional Background
- Skills
- Defining Work
- Notable Achievements
- Links
- Social Media Profiles
- Education
- Hobbies and Interests
- Strengths
- Weaknesses
- Goals
- Projects
- Publications
- Awards and Honors
- Meeting Notes
- Communication Preferences
Create Query Views
Now we can use various Dataview plugin queries to aggregate our contact data into handy views. Following is one example that gives us a list of email addresses for all contacts at a glance. Refer to the Dataview plugin documentation and the Obsidian Forum to learn how to create more advanced Dataview queries.
```dataview
TABLE WITHOUT ID
file.link AS Person,
email AS Email,
phone AS Phone
FROM #type/person AND -"System/Templates"
SORT file.name asc
```
In the query shown above, -“System/Templates” prevents the template document from showing up in the query results (assuming the template is stored in that path; change this to suit your own path accordingly).
Grouping with Tags
To organize people into groups, you can tag them. For this, I create a tag hierarchy that begins with the tag, #memberOf. For example:
#memberOf/usmc/1–3/delta/3rd-platoon/3rd-squad
Such a tag makes the person browsable by the full hierarchy of tags. If I click the “usmc” tag in the tag browser, the person will be returned. Likewise, the person will be returned by the tag #usmc/1–3, by #usmc/1–3/delta, by #usmc/delta/3rd-platoon and so forth.
Another way to group people is to create Organization pages and then just link to person instances from an Organization instance. This technique is known as a MOC (Map of Content). While it gives forward and backlinks from both the Person and the Organization pages, I find the maintenance with this approach to be a little too cumbersome.
Conclusion
In this article, I shared my personal recipe for managing contacts (Persons) in Obsidian.
The people I know are “first-class citizens” in my knowledge vault, just as they are in my life. My Obsidian Person instances (markdown documents of #type/person) not only give me quick access to contact information, but also allow me to relate and integrate primary Person entities throughout all of my notes. This turns each Person page into a “topic hub” where I can easily see all the information I’ve related to a given person over time.
I hope this recipe gives you some ideas or a solid start in creating the system that works for you!
First published on Medium on .