Task Management Redefined with Obsidian
A Recipe for Leveling-Up Your To-Do List
· Personal knowledge management

You’re a goal setter, an adventure seeker, a change maker, and a ground breaker. You’re highly self-disciplined and highly engaged with life — always at attention and always sharpening the saw. In short, you’ve got things to do, so…let’s get on with it.
The Problem
Markdown checkboxes simply will not do. They are woefully inadequate for someone like you!
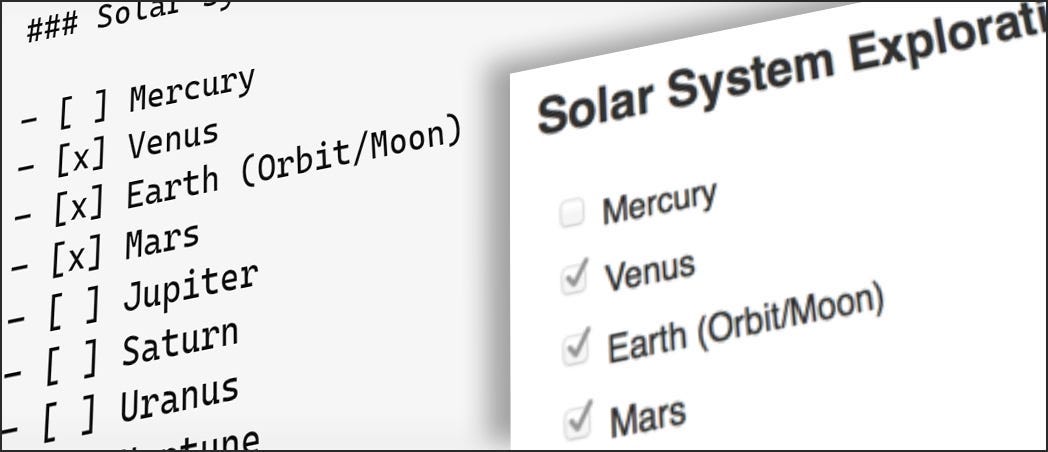
Here are just a few of the reasons why your markdown checkboxes are due for an upgrade:
- Lack of context or details — When did you create the task? When is it due? Where do you put all of your task-related notes? How about subtasks? You can only fit so much information on one markdown checkbox line!
- Difficult to prioritize or categorize — With the single-line markdown checkbox, cut and paste is the only way to organize your To-Do list. How one-dimensional! How claustrophobic! Depending on the context, you need to be able to classify and organize tasks by any one of a multitude of facets and you need to do it pronto — on the fly.
- Not conducive for linking related tasks and building a knowledge base around tasks — By using single-line markdown checkboxes, you may be missing the opportunity to build a valuable knowledge base as you solve problems and get things done. You could be forging new connections and relating information in ways that truly help you live and work more effectively in the future.
Nuff said. So what’s the solution?
The Solution
Enter the MetaLife Method® for Personal Knowledge and Life Management (PKLM), which prescribes, among other things, a powerful Task Management system based on Obsidian Plugins and the use of markdown documents to represent individual tasks or To-Do items.

Tip: This recipe comes pre-baked in the MetaLife Obsidian reference vault, which you can download here: metalife-method-1.3.2 (5.4 MB). You might also find a more recent version on the releases page.
Folder Structure
Our root folder structure is based on Tiago Forte’s PARA Method which recommends the following:
- 📁 Projects — Short-term efforts in your work or life that you’re working on now
- 📁 Areas — Long-term responsibilities you want to manage over time.
- 📁 Resources — Topics or interests that may be useful in the future.
- 📁 Archive — Inactive items from the other three categories.
In this system you will be creating one markdown document for each task or to-do item, so you’ll need a folder for them. You can put this folder wherever you want, but if you use PARA for your root folders, we recommend placing a Tasks folder under Areas, and child folders for Tasks-Open and Tasks-Closed as shown below.
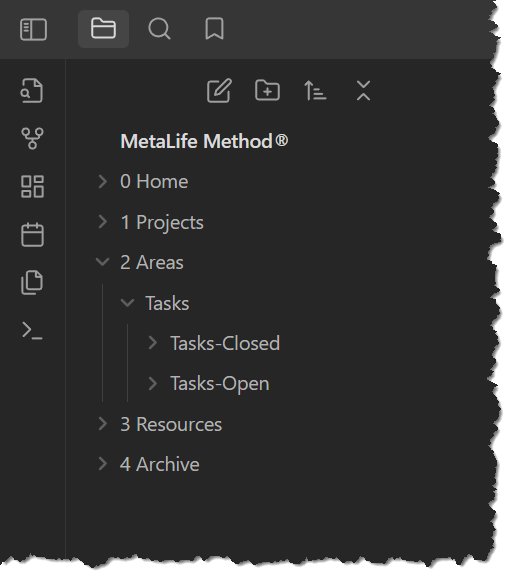
Note that a task can be closed without having been completed, hence the label is “Tasks-Closed” and not “Tasks-Completed”.
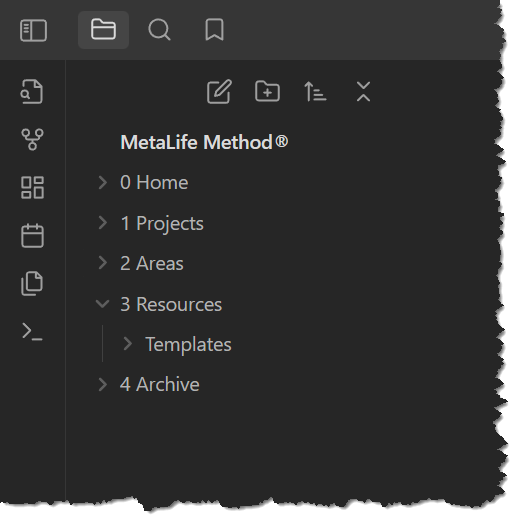
To create new task documents, we’ll be using a template, so we need a place to store that too. You can put your Templates folder wherever you want, but if you use PARA, we recommend placing it directly under the Resources folder as shown below.
Task Template
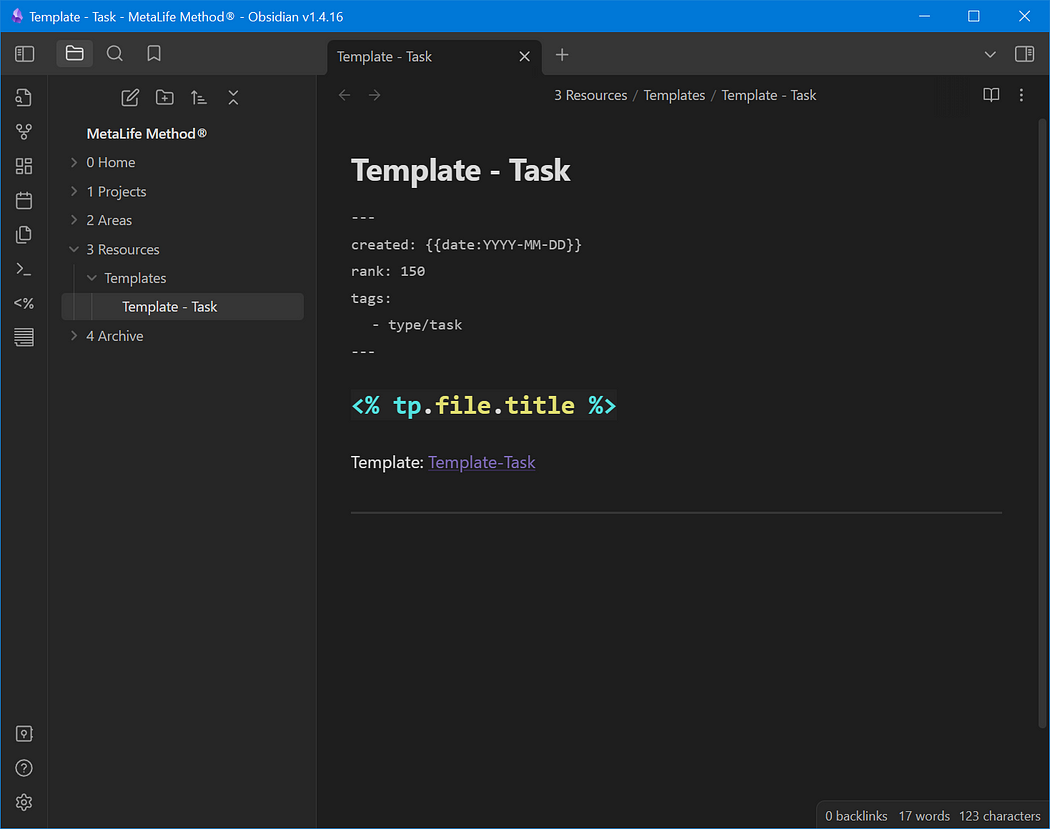
Now, within the Templates folder, create a new markdown document named Template — Task.md. In the future, you can add as many metadata properties to the template as you find useful, but for now, start with the minimum required properties and default values shown below.
Tip: To temporarily change your properties to source mode, so that you can enter the created date formula as shown, see: Obsidian properties : How to set up a template with dynamic dates by Stéphane Sulikowski.
Here’s a description of the recommended minimum front-matter properties:
- created — with the value, {{date:YYYY-MM-DD}}, the created date will be saved in the specified format automatically. Keeping the created date is helpful to understanding the history and lifetime of a task and with work-related tasks it’s often required for auditing purposes.
- rank — the rank (a number) will be used to prioritize tasks. The value 150 sets a high default, which you may (but do not have to) change when you create a new task. We encourage you to use this simple and proven numbered priority scheme. Anything more complex is unnecessary and…well, more complex.
- tags — all tasks need to be tagged so that we can easily aggregate them with plugins and tag-based search. By using type/task in the template, all newly created tasks will be appropriately tagged.
The heading 1 title of the document uses # <% tp.file.title %>, which will get replaced with the file name (without the file extension) when a new task is created. You will be prompted to enter this title when you create a new task using a keyboard shortcut, thanks to the QuickAdd plugin. We’ll describe how to set that up in the coming plugin setup section.
Plugin Setup — Templater
Install the Templater plugin for Obsidian if you haven’t already. This will enable us to use template functions such as automatically titling a document with the task name when a task is created.
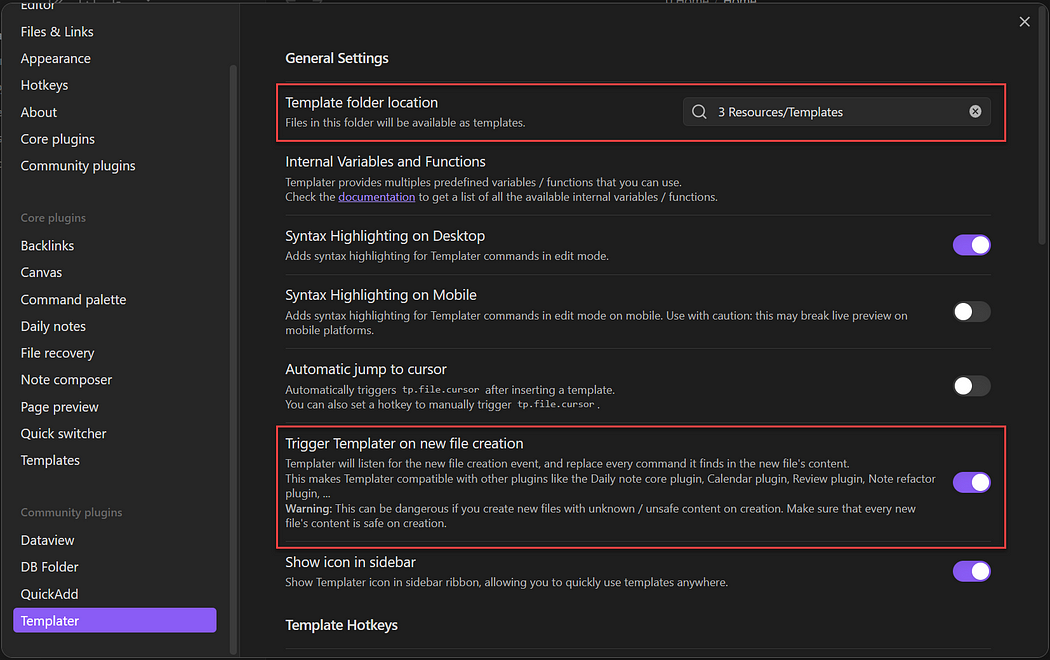
Once installed and enabled, go to the plugin’s General Settings and set:
- Template folder location = 3 Resources/Templates
- Trigger Templater on new file creation = ON
Plugin Setup — QuickAdd
Install the QuickAdd plugin to allow rapid creation of new tasks with a keyboard shortcut.
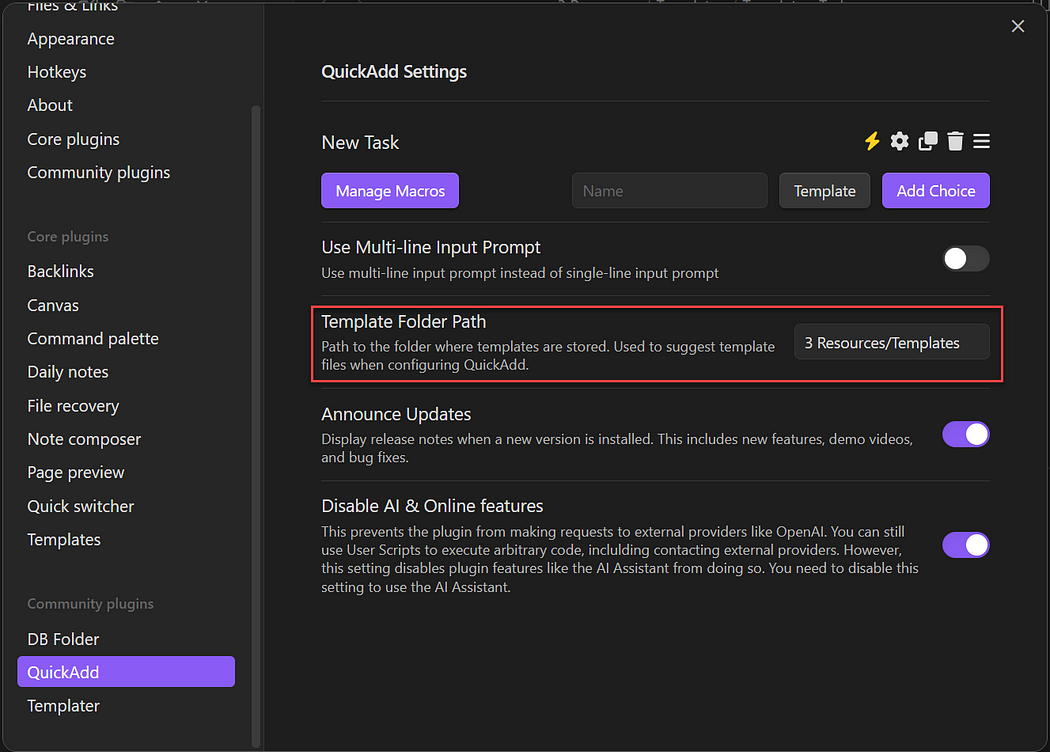
Once installed and enabled, go to the QuickAdd Settings and set:
- Template Folder Path = 3 Resources/Templates
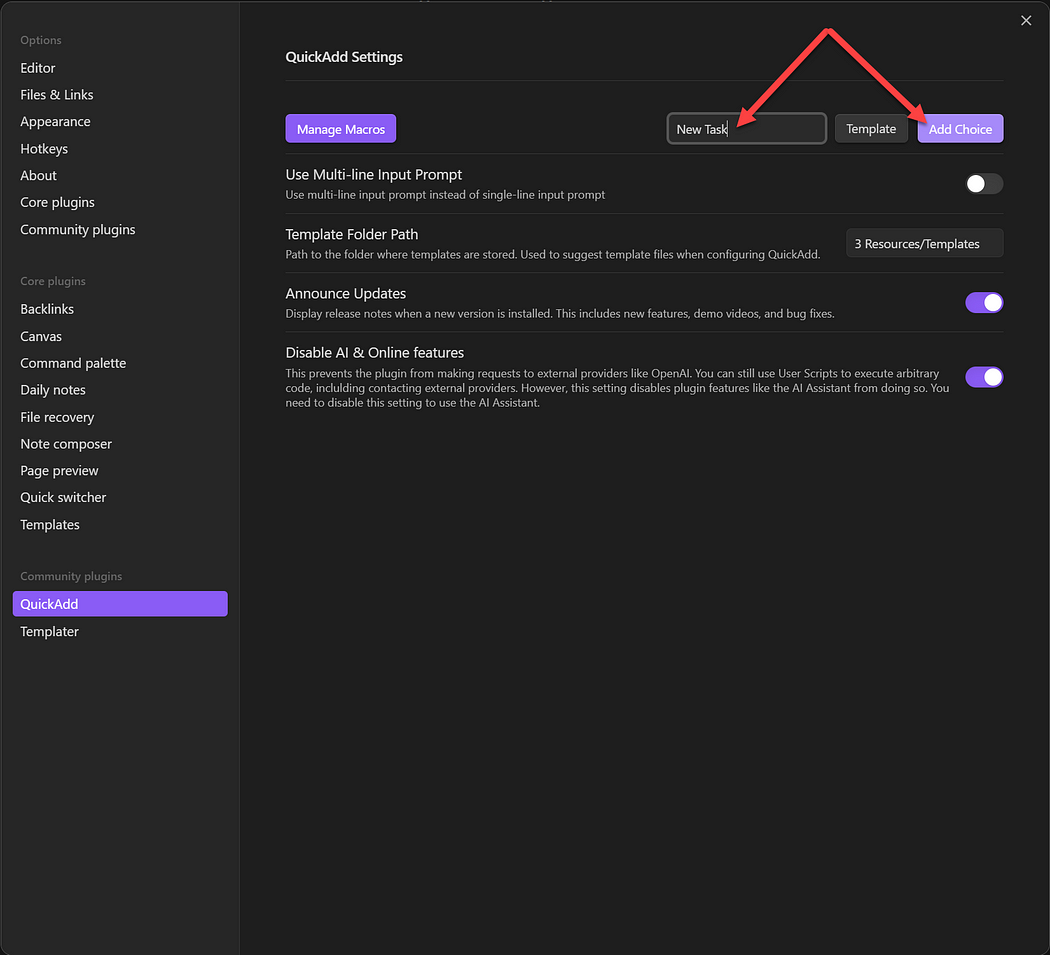
Next, we need to add a Template choice. To the right of the Manage Macros button, enter New Task in the text field and then click Add Choice as shown below.
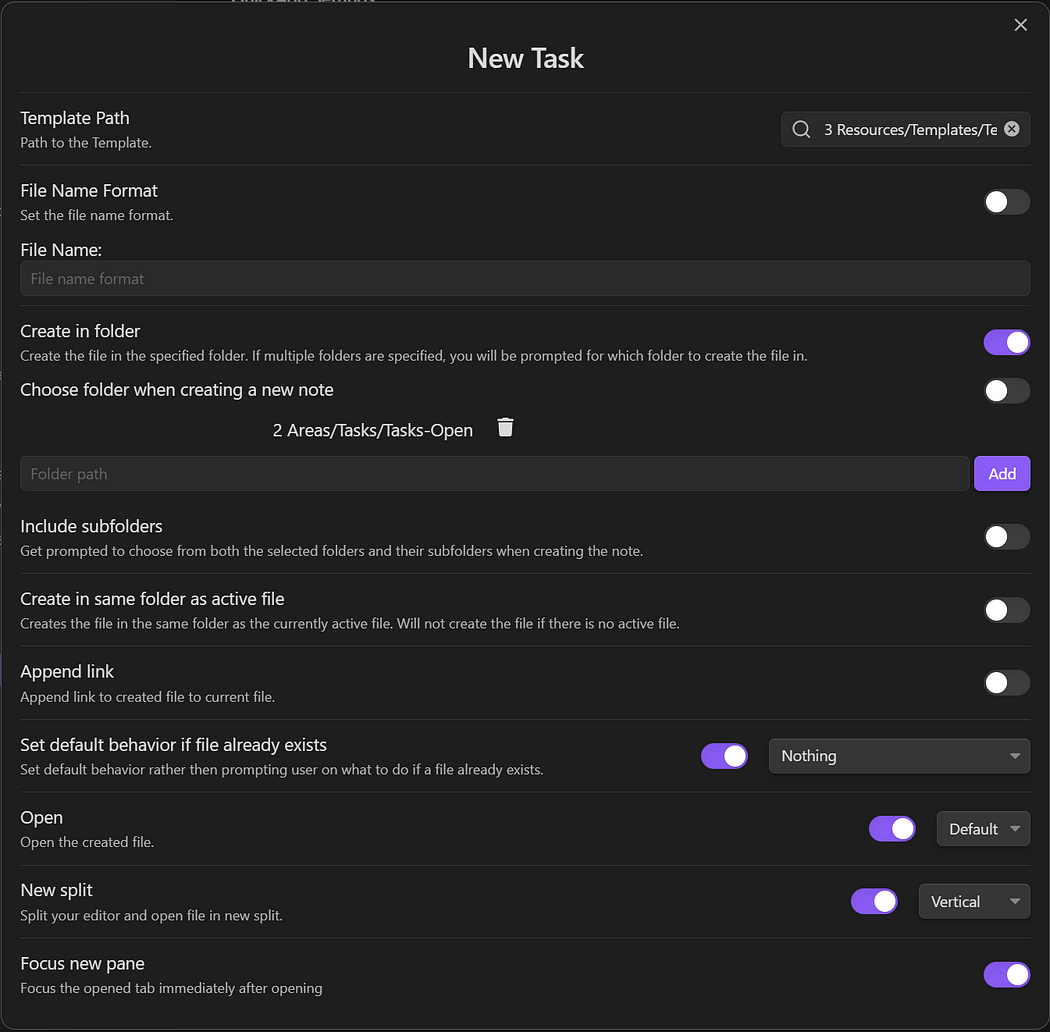
Click the gear icon for the New Task item created to configure the following properties for it:
- Template Path = 3 Resources/Templates/Template — Task.md
- Create in folder = ON
- Add the folder path: 2 Areas/Tasks/Tasks-Open
- Set default behavior if file exists = ON, Nothing
- Open = ON, Default
- New Split = ON, Vertical
- Focus new pane = ON
Shown below…
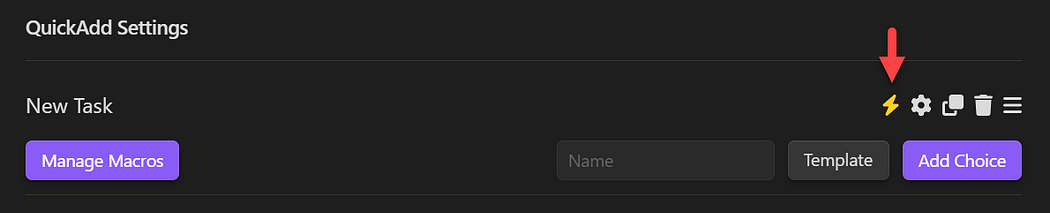
Once you’ve added the New Task Template choice, be sure to enable it by selecting the little lightning bolt as shown below:
Add a Hotkey for Creating a New Task
To add a hotkey for creating a new task:
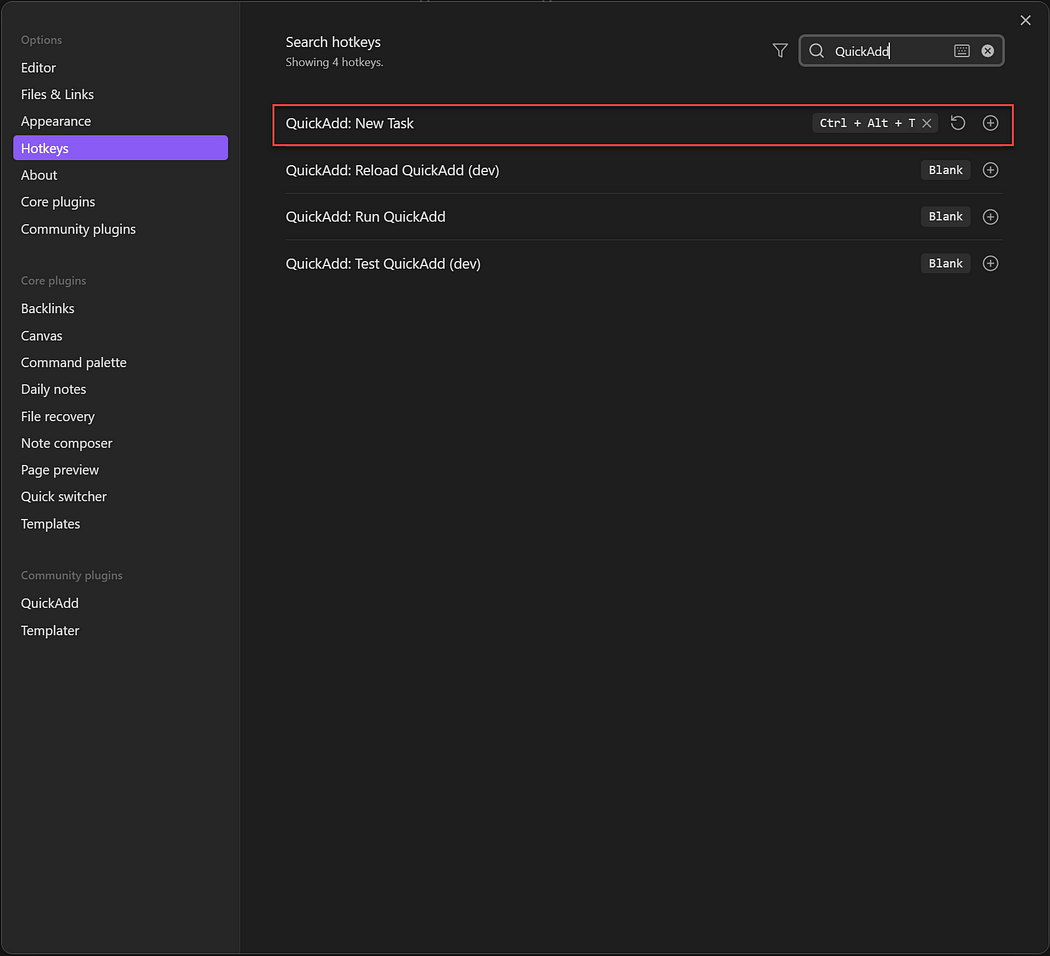
- Navigate to Obsidian Settings > Hotkeys
- Search the keyword “QuickAdd”; QuickAdd: New Task should show up in the list
- Press the plus sign to customize the command and add your hotkey combination (CTRL + ALT + T, for example)
Shown below is the hotkey assigned to the QuickAdd command.
Create a New Task
Now it’s time to give it a test drive. To create a new task, simply enter your hotkey (CTRL + ALT + T in our example case). A dialog will prompt you for the task name. This is also the file name, so you will not be able to use any special characters that are not allowed in file names.

When you click OK, the new task document is created and opened in a vertical panel with the application focus as shown below:
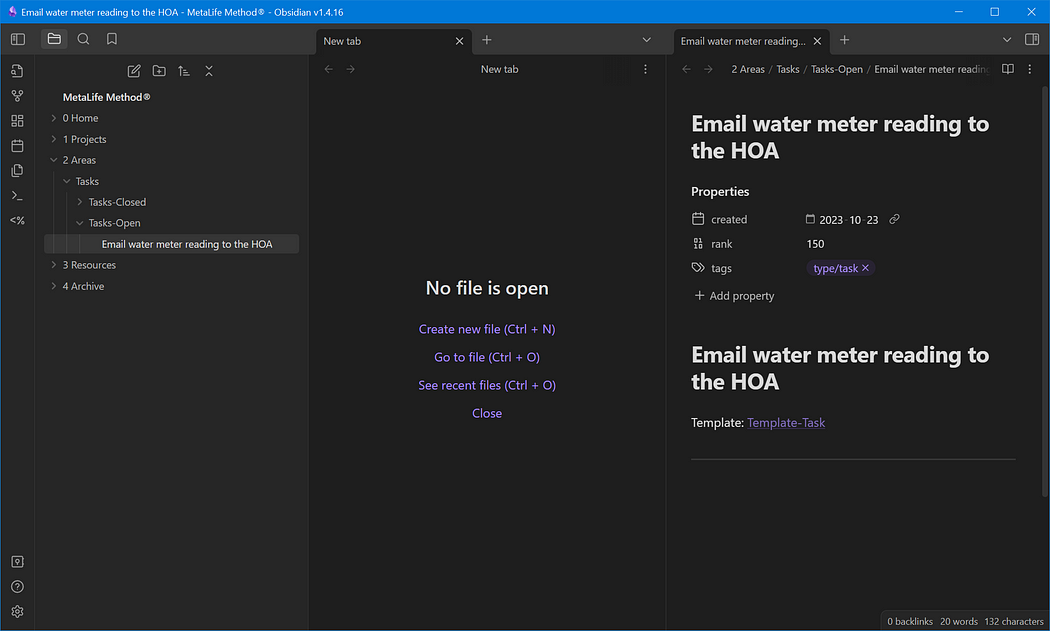
Now you can add comments or notes to the task, change the rank, and add additional front-matter properties as desired. Notice in the folder structure how the task document was created in the Tasks-Open folder. To change the state of a task to closed, you can simply drag it into the Tasks-Closed folder.
Tip: Rank tasks by increments of 5. In this way you always leave a little elbow room to insert tasks before or after one another in the ranking. Nevertheless, it’s also fine to have multiple tasks with the same rank.
Displaying a Sorted Task List
Now that we can easily create task documents with a hotkey, we need a way to aggregate all of our Open tasks into a sorted To-Do list. There are two different methods for achieving this, by way of two different Obsidian plugins, and since each has its own pluses and minuses, we suggest setting up to use them both.
Plugin Setup — Dataview
The first approach uses the Obsidian Dataview plugin and Dataview queries.
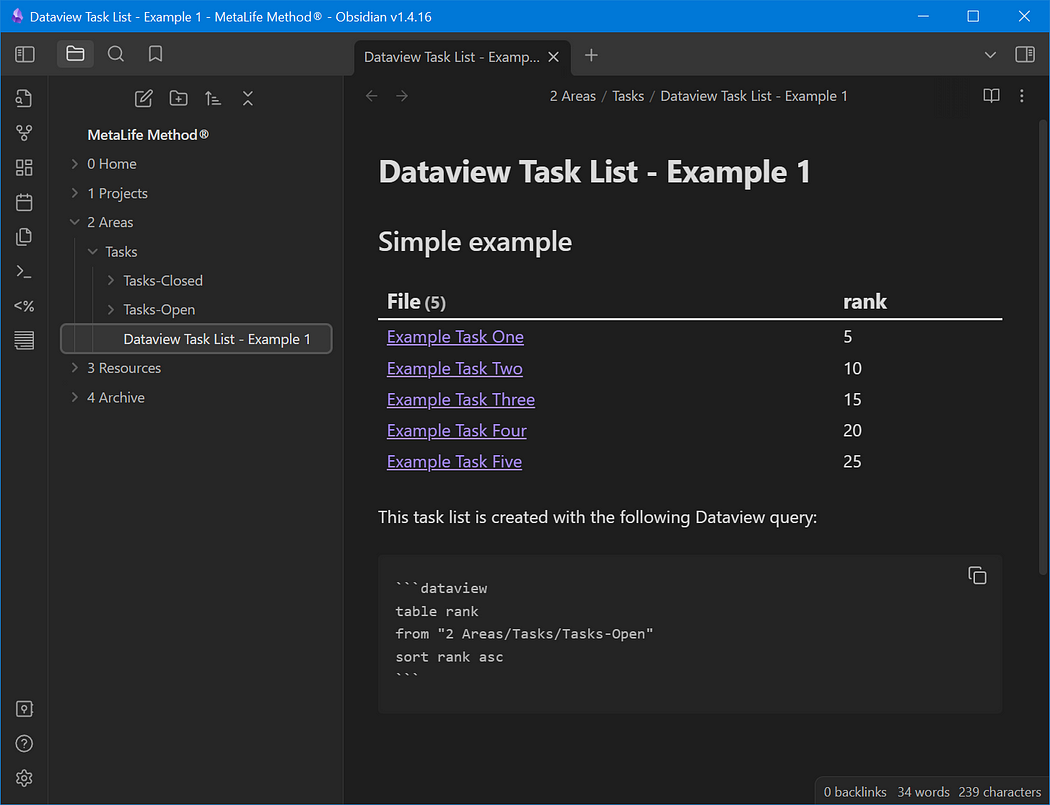
Once you’ve installed and enabled the Dataview plugin, you can place the following Dataview query snippet on any document to generate a simple task list sorted by rank.
```dataview
table rank
from "2 Areas/Tasks/Tasks-Open"
sort rank asc
```
This generates a table with the task name (file name, hyperlinked) and the rank as shown below.
Creating More Sophisticated Dataview Queries
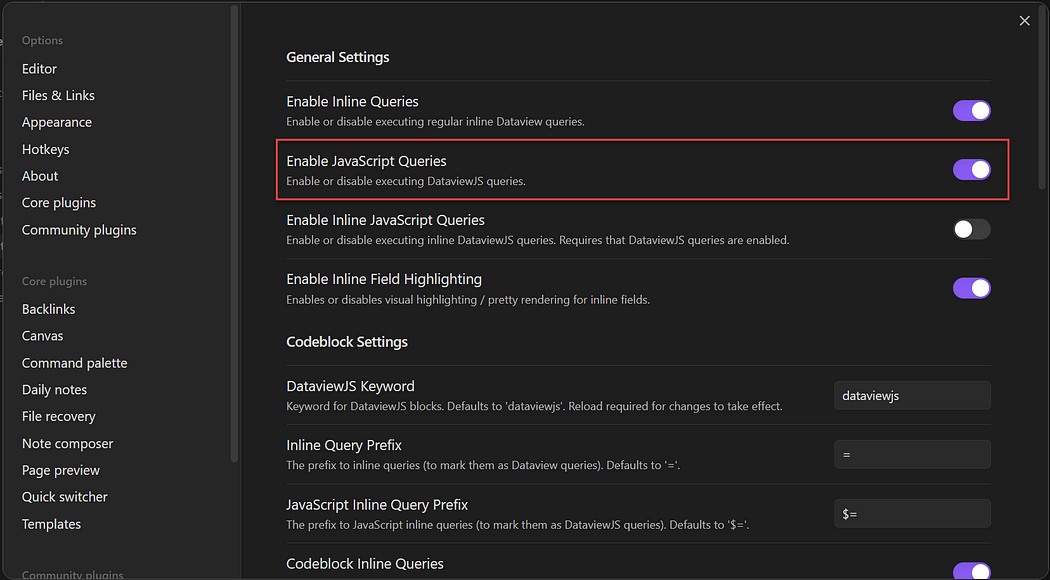
If you’re feeling adventurous, and you’re comfortable with JavaScript (or at least comfortable hacking it), you can create much more sophisticated Dataview queries by enabling Dataview JavaScript Queries in the Dataview plugin settings as shown below.
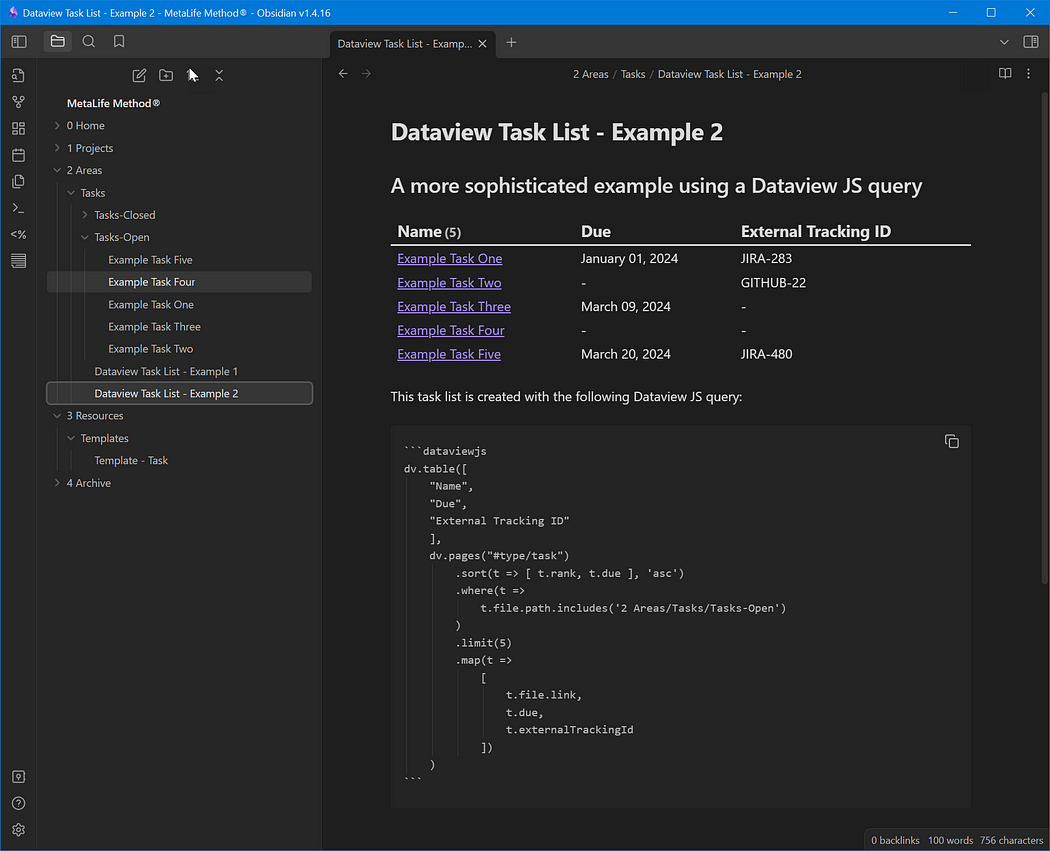
Once JavaScript Queries have been enabled, you can write more sophisticated, and more powerful queries like the following…
```dataviewjs
dv.table([
 "Name",
 "Due",
 "External Tracking ID"
 ],
 dv.pages("#type/task")
     .sort(t => [ t.rank, t.due ], 'asc')
  .where(t =>
   t.file.path.includes('2 Areas/Tasks/Tasks-Open')
  )
  .limit(5)
  .map(t =>
   [
    t.file.link,
    t.due,
    t.externalTrackingId
   ])
    )
```
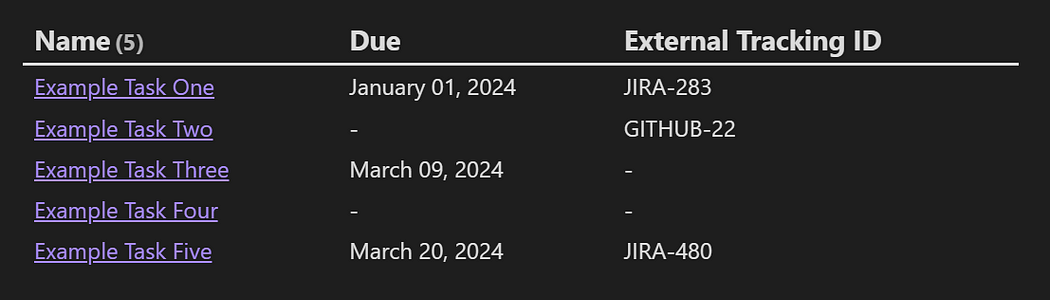
Assuming you use the additional metadata fields due (date) and externalTrackingId (text), this query lists all open tasks, sorted by rank first, and then due date. It limits results returned to 5. As shown, we can list additional front-matter properties. The externalTrackingId, for example, is a custom property I use to relate my tasks to external issue tracking systems like Jira or GitHub.
Bam! You can slice, dice, and Rubik’s-cube your vault as if it were a database. Needless to say, the Dataview plugin for Obsidian is sick (and I mean that in the good way).
Plugin Setup — DB Folder
The second approach to listing tasks and their properties uses the Obsidian DB Folder plugin, which depends on the Dataview plugin to function.
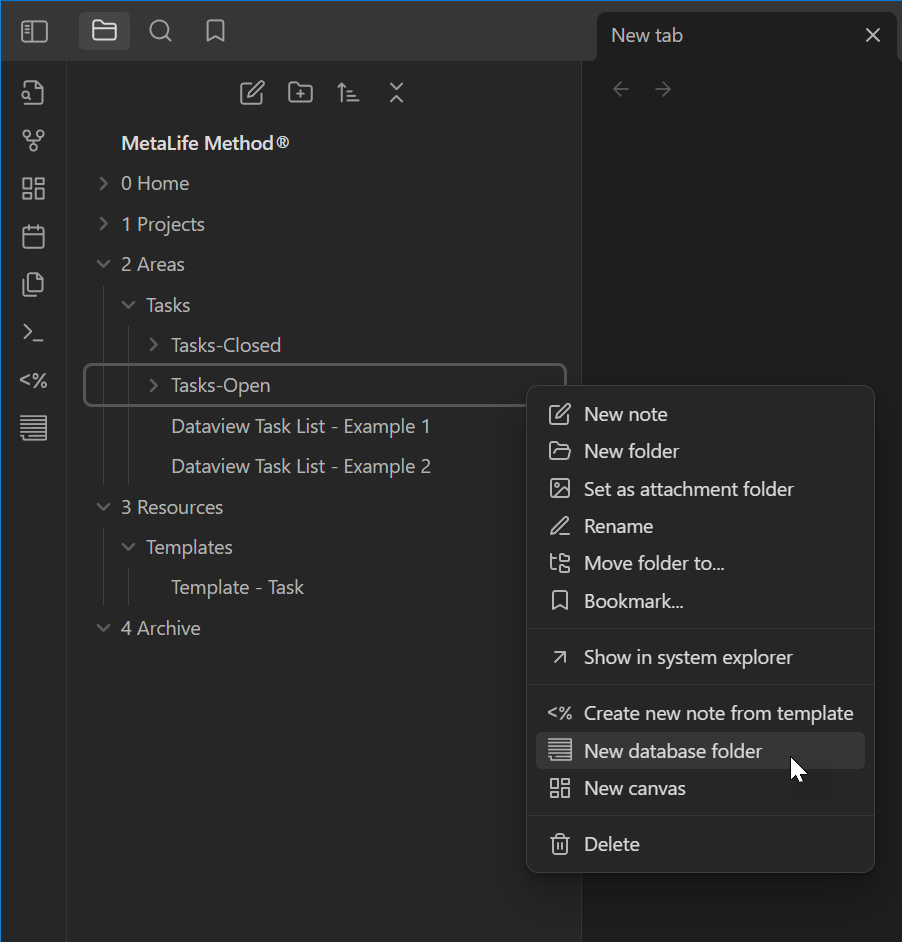
Once you’ve installed and enabled the DB Folder plugin, right-click on your Tasks-Open folder and select the New database folder option from the context menu as shown below.
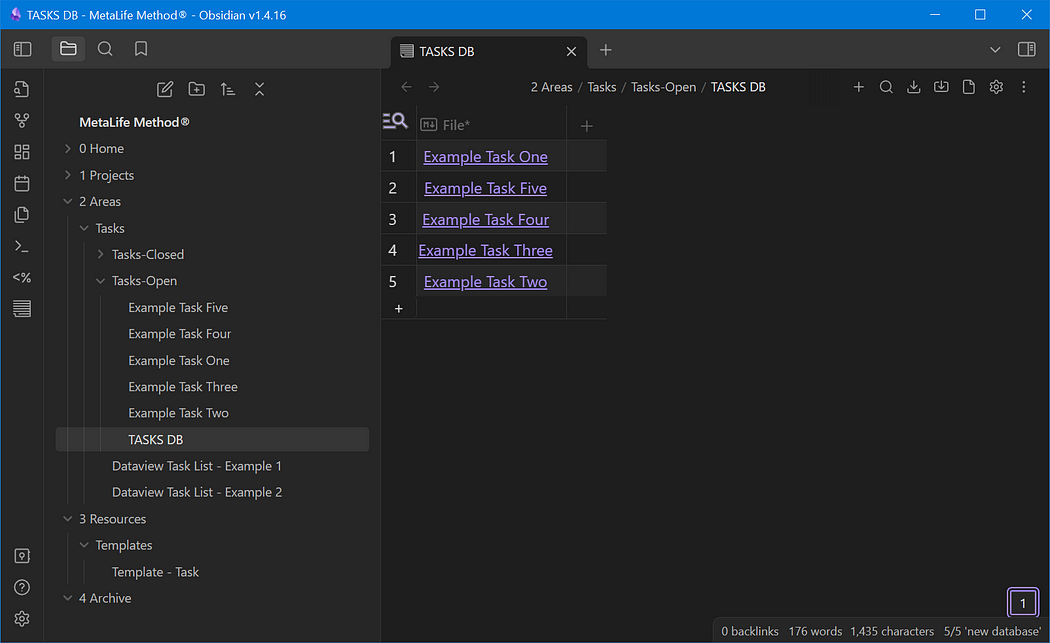
This will create a new Untitled database document inside of the Tasks-Open folder. Rename it to something meaningful such as “TASKS DB” (we use all-caps to more clearly differentiate it from the task documents in the same folder). By default, the data table will list all documents in the database folder as shown below.
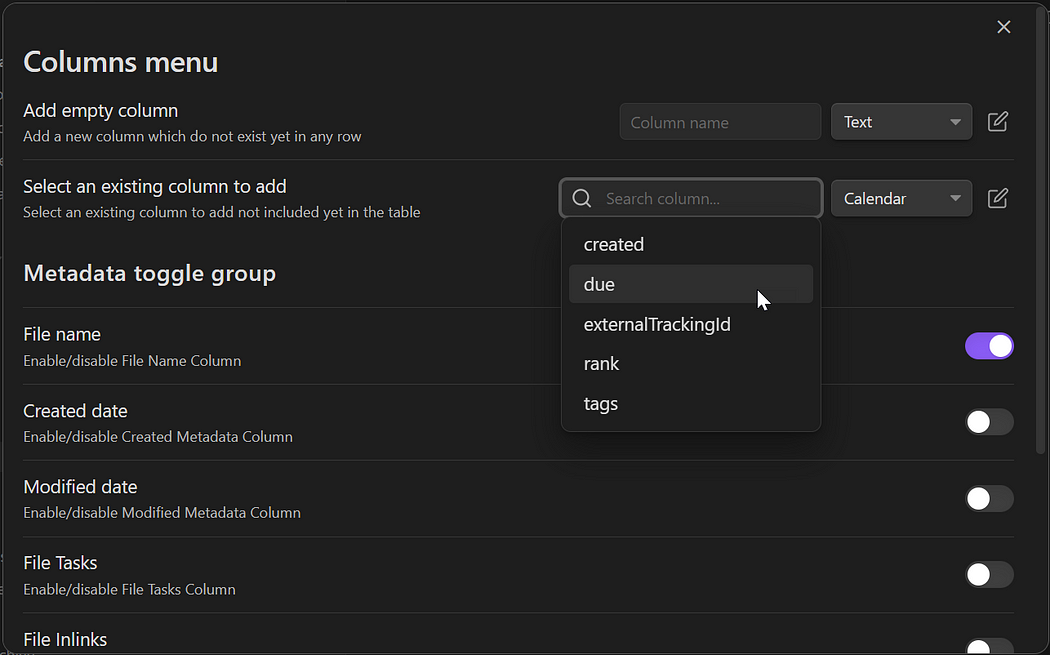
To add additional front-matter properties from your tasks to the data table, you can click on the plus sign in column 2, and Select an existing column to add. An option will be shown for each of the properties found across your tasks. Notice below, for example, that we have the option, due, for the due date and our other custom property, externalTrackingId.
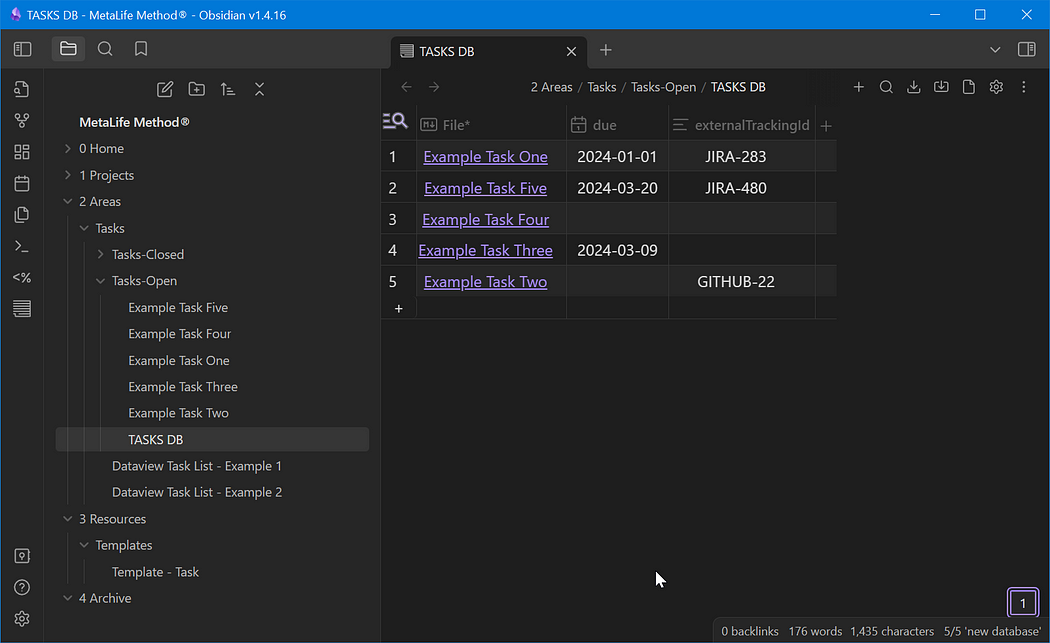
Once we’ve selected those two options, and clicked to add them to the table and refresh, we see them as columns in the data table as shown below.
Columns in the data table can be sorted by clicking the column header name. Columns can be renamed. Columns can also be added for front-matter properties that do not yet exist. Column options include Number, Text, Select, Tags, Calendar, Calendar time, Checkbox, Formula, Relation, and Rollup. The DB Folder plugin is truly one of the most excellent, dudes.

Conclusion
In this article we demonstrated how we use Obsidian plugins and markdown documents to create a powerful task management system in Obsidian. If you’ve been using traditional markdown checkbox tasks, we hope you’ll find this approach to be a level-up.
Tip: This recipe comes pre-baked in the MetaLife Obsidian reference vault, which you can download here: metalife-method-1.3.2 (5.4 MB). You might also find a more recent version on the releases page.
Bonus Tip
In your task template, consider adding links to your To Do List document (to the TASK DB database folder page, for example). This will make it easy to navigate back to the full list from any open task.
First published on Medium on .