How to Apply Texture in ZBrush
Posted on Sep 3, 2018 (last modified Jun 1, 2021)
A quick tutorial of how to apply a texture to an object in ZBrush.
For this tutorial, we’ll work with a simple sphere object.
Start by drawing a Sphere3D onto the canvas and press the T key to go immediately into edit mode.

In the Tool palette, click Make PolyMesh3D.
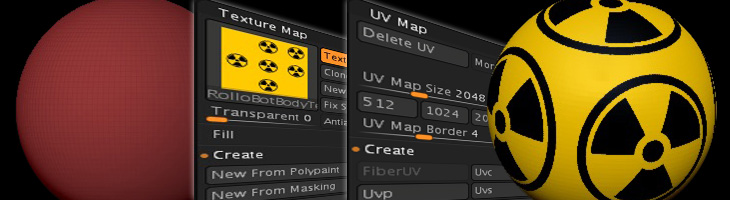
In the Tool palette > Texture Map, click the empty texture box (slot).

In the resulting dialog, click Import to find your texture map image, which I’m told must be either PhotoShop PSD, JPEG, or TIFF. You should then see your texture map loaded into the slot and the Texture On button should be selected (on), as shown below.

If you had a dark matcap on the object you will see the texture projected onto that base color, as shown below, which is not really what we want.

To fix this, click the matcap slot…

Pick something whiter; I find that SkinShade4 works well.

Now, the only problem is that the texture is distorted on the object because of the UV mapping. We can adjust this in the Tool palette > UV Map section. In this case, we need only click the Uvb button to apply Uv Box.

You could do various other UV adjustments here depending on your need. Try clicking the Morph UV button to unwrap the selected SubTool into the UV layout; this is a very cool way to see how the UV is actaully laid out on the mesh.
As you can see below, simply applying the Uv Box was sufficient for this case.
