Liferay 7 Ubuntu Developer VM Setup Log
Posted on Oct 24, 2017 (last modified May 7, 2021)
This page provides a log of how I setup a Liferay development environment using Ubuntu and VMWare Fusion. The idea is to be able to develop for Liferay CE and Liferay DXP although only the CE portion is fully setup so far, with the DXP portion standing by for potential completion in the case of a customer project. I like to snapshot my VMs frequently so that I can roll back at any point, so you will see indicators everywhere that I’ve taken a snapshot.
This also includes an acid-test, which is itself a mini-tutorial on how to create a RESTful web service endpoint in Liferay.
Create an Ubuntu virtual machine
- Download Ubuntu 16.04.3 LTS Desktop ISO:
https://www.ubuntu.com/download/desktop - Install using the easy install (drag and drop the ISO after selecting new in VMWare Fusion)

Password is: dev - On this next screen, do not click FINISH!

Instead, click Customize Settings - Save the VM as “Ubuntu 64-bit Server 16.04.3” (default file name for the VM)
- In the virtual machine settings:
- Processors: 2 Processor Cores
- Memory 4000 MB
- Disk size: 60 GB (but not pre-allocated); leave split into multiple files checked
- Start up the VM
- Reinstall VMWare Tools using the instructions for installing here:
https://kb.vmware.com/selfservice/microsites/search.do?language=en_US&cmd=displayKC&externalId=1022525
RESTART - SNAPSHOT: CLEAN INSTALL W VMWARE TOOLS
Update Ubuntu
developer@ubuntu:~$ sudo su -
[sudo] password for developer:
root@ubuntu:~# dev <-password
root@ubuntu:~# apt-get update && apt-get upgrade
SNAPSHOT: UBUNTU UPDATE & UPGRADE
Install Java
Note by the following command that Java is not installed…
developer@ubuntu:~$ java -version
The program 'java' can be found in the following packages:
 * default-jre
 * gcj-5-jre-headless
 * openjdk-8-jre-headless
 * gcj-4.8-jre-headless
 * gcj-4.9-jre-headless
 * openjdk-9-jre-headless
Try: sudo apt install <selected package>
developer@ubuntu:~$
Change to root…
sudo su -
(enter password)
apt-get install software-properties-common
add-apt-repository ppa:webupd8team/java
apt-get update
apt-get install oracle-java8-installer
Check if Java is successfully installed
java -version
java version "1.8.0_111"
Java(TM) SE Runtime Environment (build 1.8.0_111-b14)
Java HotSpot(TM) 64-Bit Server VM (build 25.111-b14, mixed mode)
Fix for network service discovery disabled
I got this on a startup.

Fix
It looks like avahi-daemon is started when the network connection is established (/etc/network/if-up.d/avahi-daemon). This notification is informing you that mDNS (Avahi) has been disabled. It’s only used for a small number of applications that only work on the local network, it won’t adversely affect your internet connection or DNS.
The most well known use for mDNS is sharing music with Rhythmbox (or iTunes) over your LAN. It’s an Apple technology, but it’s largely been ignored in favour of uPNP or DLNA.
To disable it, you must edit the file /etc/default/avahi-daemon as root:
sudo -i
gedit /etc/default/avahi-daemon
and add this line (or change it if already exists to):
AVAHI_DAEMON_DETECT_LOCAL=0
Source: http://ubuntuforums.org/showthread.php?t=1632952
Fix for colord-sane crash on startup

Fix
sudo apt-get remove sane-utils
sudo apt-get remove colord
Worked for me, 16.04 running XFCE, but i’ve no need for color profiles.
SNAPSHOT: STARTUP ERRORS FIXED
Install MySQL 5.6
You’ll need MySQL 5.6 for the latest version of Liferay (at this point in time).
sudo add-apt-repository 'deb http://archive.ubuntu.com/ubuntu trusty universe'
sudo apt-get update
sudo apt install mysql-server-5.6
sudo apt install mysql-client-5.6
MySQL root credentials
| user | root |
|---|---|
| password | fruityrooty22 |
SNAPSHOT: MYSQL 5.6 SERVER AND CLIENT
Start the MySQL server and enable the service on system boot
Once the MySQL installation is completed, start the MySQL server and enable the service on system boot:
sudo su -
systemctl restart mysql
systemctl enable mysql
SNAPSHOT: ENABLE MYSQL ON BOOT
Install MySQL Workbench
Install MySQL Workbench using the APT package manager:
sudo apt install mysql-workbenchRun MySQL Workbench
Launch MySQL Workbench from the terminal:
mysql-workbenchTo view more launch options from the command line interface, use the --help option:
/usr/bin/mysql-workbench --helpSNAPSHOT: MYSQL WORKBENCH
Secure the MySQL installation
sudo su -
mysql_secure_installation
SNAPSHOT: SECURE MYSQL INSTALLATION
Download Liferay assets
- Download Liferay Portal CE from the site using the Firefox browser in the virtual machine.
- Alsxo download the latest Liferay IDE for Linux (64bit)
Now, we have both in our Downloads directory. This is what we’ll need to setup a basic Liferay Portal CE dev environment. Note that in the future, I want to also be able to do Liferay DXP development on the same system. Thus, I’ll name things using “CE” versus “DXP” to distinguish.
- Download Liferay DXP from Customer Portal
- Download Liferay Developer Studio from Customer Portal
- You DO NOT need to download Liferay Workspace as it is within Liferay Developer Studio
To simplify subsequent steps, I renamed my downloads as follows:

SNASPSHOT: LIFERAY ASSETS DOWNLOADED
Unzip and move Liferay CE
In a terminal…
cd ~
cd Downloads
unzip liferay-ce.zip
sudo mv liferay-ce-portal-7.0-ga4/ /opt/liferay-ce
Notice that during the move operation, the directory was renamed to simpley “liferay-ce”.
Next, we’ll do a similar procedure for Liferay DXP.
Unzip and Move Liferay DXP
In a terminal…
cd ~
cd Downloads
unzip liferay-dxp.zip
sudo mv liferay-dxp-digital-enterprise-7.0-sp4/ /opt/liferay-dxp
Notice that during the move operation, the directory was renamed to simpley “liferay-ce”.
Delete Liferay CE and DXP Zips
Now we can delete the original archive files to clean up and free some space…
cd ~
cd Downloads
rm -rf liferay-ce.zip
rm -rf liferay-dxp.zip
SNAPSHOT: LIFERAY CE AND DXP IN PLACE
Create MySQL databases for Liferay
Since I am setting up my dev to support both liferay-ce and liferay-dxp, I’ll create two databases, on for each instance.
Run the ‘mysql‘ command as a MySQL super user. The default user is ‘root’ with a blank password.
mysql -h localhost -u root -pfruityrooty22Create an empty Liferay database schema by running this command:
CREATE DATABASE liferayce CHARACTER SET utf8 COLLATE utf8_bin;
CREATE DATABASE liferaydxp CHARACTER SET utf8 COLLATE utf8_bin;
Create the Liferay database user by running this command. Replace ‘liferayuser’ and ‘liferaypass’ with a username and password of your choice. If Liferay is not running on the same server as your MySQL database server, replace ‘localhost’ with the hostname or IP address of the Liferay server.
GRANT ALL PRIVILEGES ON liferayce.* TO 'liferay_db_user'@'localhost' IDENTIFIED BY 'liferay_db_user22';
GRANT ALL PRIVILEGES ON liferaydxp.* TO 'liferay_db_user'@'localhost' IDENTIFIED BY 'liferay_db_user22';
liferay_db_user credentials
…for both lifreayce and liferaydxp databases…
| User |
liferay_db_user
|
|---|---|
| Password |
liferay_db_user22
|
Enter quit to exit out of mysql.
If you want, you can execute the following command to fire up the MySQL Workbench to verify:
mysql-workbenchYou should see the following…
(click to enlarge…)

SNAPSHOT: EMPTY LIFERAY DBS CREATED
Create portal-ext.properties files
Create the following two portal-ext.properties files and place them in their respective Liferay home directories.
portal-ext.properties for liferay-ce
#
# MySQL
#
jdbc.default.driverClassName=com.mysql.jdbc.Driver
jdbc.default.url=jdbc:mysql://localhost/liferayce?useUnicode=true&characterEncoding=UTF-8&useFastDateParsing=false
jdbc.default.username=liferay_db_user
jdbc.default.password=liferay_db_user22
portal-ext.properties for liferay-dxp
#
# MySQL
#
jdbc.default.driverClassName=com.mysql.jdbc.Driver
jdbc.default.url=jdbc:mysql://localhost/liferaydxp?useUnicode=true&characterEncoding=UTF-8&useFastDateParsing=false
jdbc.default.username=liferay_db_user
jdbc.default.password=liferay_db_user22
Note:
You can find the default portal.properties file inside of…
tomcat/webapps/ROOT/WEB-INF/lib/portal-impl.jar
That can be used as a reference (has lots of nice comments in it; but you’ll never edit that directly – you just override properties within it)
SNAPSHOT: PORTAL-EXT.PROPERTIES CREATED
I corrected the above files AFTER creating this snapshot, so the values shown above are what they SHOULD be for this snapshot. If you go back to this snapshot for some reason or use any between this one up to and including BUMP TOMCAT, you need to revise the files above as shown above.
Remove Libre Office from the VM
This is a developer VM; we don’t need it.
sudo apt-get remove --purge libreoffice*
sudo apt-get clean
sudo apt-get autoremove
SNAPSHOT: LIBREOFFICE* REMOVED
Increase Tomcat memory settings
In each Liferay home directory, navigate into the tomcat/bin directory and edit the setenv.sh file. You want to change
Xmx2048m -XX:MaxPermSize=1024m
It should look something like this after you change it…
setenv.sh
CATALINA_OPTS="$CATALINA_OPTS -Dfile.encoding=UTF8 -Djava.net.preferIPv4Stack=true -Dorg.apache.catalina.loader.WebappClassLoader.ENABLE_CLEAR_REFERENCES=false -Duser.timezone=GMT -Xmx2048m -XX:MaxPermSize=1024m"BUMP TOMCAT MEM
Start Liferay CE and complete configuration
/opt/liferay-ce/tomcat-8.0.32/bin/startup.sh
tail -f /opt/liferay-ce/tomcat-8.0.32/logs/catalina.out
The application may take some time to be fully started; that’s why we follow the log file for details.
After it starts, at localhost:8080, keep all the defaults in the configuration, uncheck Add Sample Data and then click Finish Configuration…
(click to enlarge…)

Then you will see:

Now, we should shut down this portal and do the same for the liferay-dxp instance.
/opt/liferay-ce/tomcat-8.0.32/bin/shutdown.sh
tail -f /opt/liferay-ce/tomcat-8.0.32/logs/catalina.out
Again, now, you must start the liferay instance. Answer YES to the Terms agreement in the web browser and enter a new password. For the new poassword, I just entered “test” again.
Liferay admin user credentials
| user | test@liferay.com |
| password | dev |
CE 7.0 GA4 CONFIGURED AND RUNNING
Install Liferay IDE
Extract the liferay-ide.tar.gz
Use drag-and-drop to move the resulting “eclipse” folder from Downloads to Home.
Start up eclipse from that directory and choose the following default workspace:
/home/developer/workspace-ce
Remove Ubuntu apps
Who has time for games?
sudo apt remove aisleriot gnome-mahjongg gnome-mines gnome-sudoku
sudo apt remove account-plugin-facebook account-plugin-flickr
Also while we’re at it, go to Ubuntu Software > Installed and remove:
- Thunderbird Mail
- Cheese (a camera app)
- Rhythmbox
- Simple Scan
- Shotwell
- Screen Reader
SNAPSHOT: LIFERAY IDE INSTALLED
Create a new Liferay Workspace Project
Create a new Liferay Workspace Project named ce-work
(do not choose to Download liferay bundle)
Note (OPTIONAL)
We will use the existing liferay-ce bundle outside of the workspace (/opt/liferay-ce). But if you wanted to use a bundle within the workspace, after the project is created, in the Gradle Tasks view execute Bundle > initBundle
When that’s done running, refresh the workspace in the IDE and you’ll see the bundle…

Modify the gradle.properties file. Uncomment and change the liferay.workspace.home.dir as shown below. This is what the gradle deploy tasks will use when executing deploy.
liferay.workspace.home.dir=/opt/liferay-ceModify the bundles > config > local > portal-ext.properties so that it points to your local database as so…
#
# MySQL
#

jdbc.default.driverClassName=com.mysql.jdbc.Driver
jdbc.default.url=jdbc:mysql://localhost/liferayce?useUnicode=true&characterEncoding=UTF-8&useFastDateParsing=false
jdbc.default.username=liferay_db_user
jdbc.default.password=liferay_db_user22
Also, edit gradle.properties and uncomment the following line so that the local config is what is used:
liferay.workspace.environment=localLater, you can change that line for another configuration.
DON’T FORGET TO DO A GRADLE REFRESH AFTER YOU SAVE! Right-click the file and select Gradle > Refresh Gradle Project
Edit the tomcat / bin / setenv.sh in the bundles of the workspace and bump the tomcat memory 2048, 1024 as described earlier.
At this point you follow the instructions for Connect to existing Liferay CE from within the workspace (only pointing to the internal bundle) and then…
For safety, we’ll modify the portal-ext.properties file for this newly created server to point to our local ce database also…

So, at this point, we have a liferay-ce bundle in /opt and we now have another one inside the Liferay workspace. Both should be pointing to our local ce database.
Again, however, we need to keep the defaults in the web browser configuration and accept the License, but Add Create Sample Data!
And then, again, restart the portal (this time, from within the IDE).
After creating the Liferay Project Workspace, you should see:

Connect to existing Liferay CE from within the workspace
Next, we’ll connect to the bundle by creating a new server so we can stop and start and watch the logs within the IDE…
Connect to the Liferay Server…


Stop the liferay-ce server by command line (if one is started), so we can restart it from within the IDE.
After the server is created, double-click to open it in the Editor.
In the Liferay Account section, make sure you enter the username and password for the Liferay administrative user and save the server file.
Now you can start the server from within the IDE…

SNAPSHOT: LIFERAY IDE SETUP
Quick acid test – create and deploy a RESTful web service
Now, we should be able to test this setup. To do so, we’ll create an OSGI module, a simple REST web service, and deploy it using Gradle deploy.
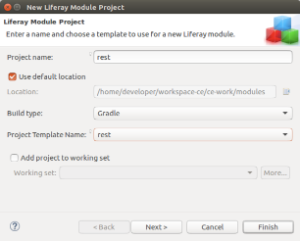
- Right-click on the ce-work node (the Liferay Workspace Project node) and select New > Liferay Module Project
- Enter project name ‘rest’ and select Project Template Name: rest as shown below…
- I am naming my class and package as shown below…

- Click Finish
- The resulting module project should look like this:

- In the Gradle Tasks view, under the Rest > build nodes and double-click build to execute the Gradle build for this module. You should get a BUILD SUCCESSFUL message in the console.
- In the Gradle Tasks view, under the Rest > build nodes, double-click the deploy task. Wait for the console to show you that the module was started.
- Note that you can also right-click on the server and select to open the gogo shell:

- In the gogo shell, type lb and hit enter. You should see there at the bottom, the OSGI module as Active…

- Now point your browser to http://localhost:8080/o/rest/greetings and you should see that it works!

SNAPSHOT: REST ACID-TEST MODULE CREATED
Conclusion
This log has demonstrated the steps that I have used to build a developer’s virtual machine (VMWare Fusion for Mac, in my case – although it should also be fine on VMWare for Windows). At this point, you’ve got enough to do some development with Liferay CE using the Liferay IDE.
Potential future step A – complete the configuration for Liferay DXP
This step will be very much like the CE step above, but we’ll wait on it as I intend to explore the CE stuff and the Liferay IDE before getting into any of the DXP stuff. When it comes to the DXP, I’ll simply pick up here and do similar steps as what was done for CE above – adding in the license file for DXP as an additional deploy step.
Potential future step B – Setup for building Liferay from source code
In a future step, I’d also like to set this environment up also for building Liferay from source code.
Potential future step C – Setup for developing with IntelliJ
I’d also like to experiment with using IntelliJ instead of an Eclipse-based IDE.
References