How to Sketch With Zspheres in ZBrush
Posted on May 5, 2018 (last modified May 7, 2021)
To start a ZSphere model, select the zsphere tool from the Tool palette (the two-toned red ball) – and draw it on the canvas.

Enter Edit mode by pressing T on the keyboard.

Press SHIFT + A to enter sketch mode. You’ll then see the two tones of the ZSphere turn to a solid color…

When sketching with ZSpheres, you can use any material. But notice that there are a few sketch materials in the materials palette.

I’ll choose the SketchGummyShine.

Because we’re in sketch mode, all we need to do is click and draw on the model to add more ZSpheres. We can hold the SHIFT key and draw to smooth things back. Remember that you can hit the X key to toggle symmetry mode.

You can always move ZSphere around by pressing W to activate Move (or press the Move button in the top bar).
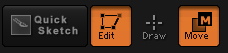
Once you’re done moving ZSpheres, you can click back on Draw.
You can hold down the ALT key and click on ZSpheres to delete them.
Press A to generate an adaptive preview. If you like it, you can go to Subtools palette > Remesh and click ReMesh All.
You might also want to go to Geometry ZRemesher and click the ZRemesher button to lay down a cleaner topology.